
In the world of printing and packaging, understanding dies is essential. Dielines are the blueprint for any printing project that ensures the final product is accurate, well-aligned, and professionally finished. This guide by CrownPackages will explore the concept of dielines for prepress and printing, their importance, and how to create and use them effectively.
Dielines are templates used in the printing industry to ensure that the design will fit correctly in the final product. These lines act as guides for cutting, folding, and creasing printed materials. They are essential in the packaging production, labels, and other printed items, ensuring that the design is perfectly translated from the digital format to the physical product.
Purpose of Dielines
Finally, the purpose of the packaging must be determined as the Dieline will affect the quality of the box.

Are you an e-commerce business that relies on shipping your products?
Or are you a retail store that needs to create a secure shelf in the store? As an e-commerce business, it’s important to consider how your packaging will arrive at your customer’s location; Therefore, there will be some extra covers or labels on the cutting line of the packaging to provide extra cushioning during construction.

The importance of dieline in the press cannot be overstated. They have several key features:
- Accuracy: Dielines ensure that design elements perfectly match the physical structure of the product.
- Consistency: Using dielines helps maintain consistency across multiple prints, which is essential for branding.
- Efficiency: Correct parts make the printing process more efficient, reducing waste and errors.
- Quality Control: Dielines provides a reference for quality controls and ensures that each print meets the required standards.
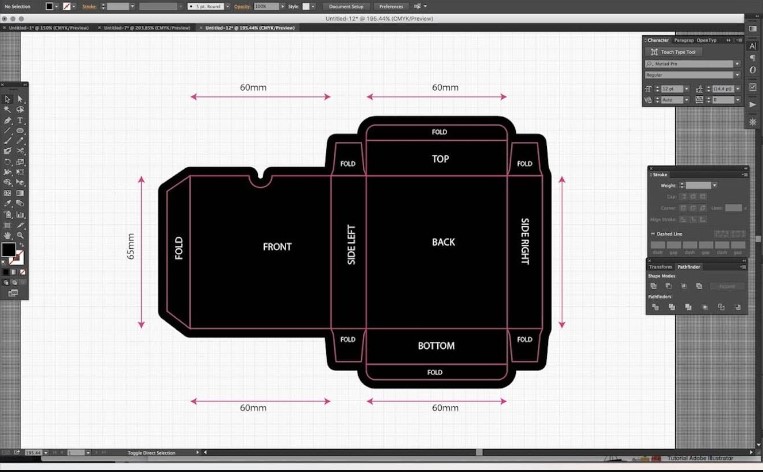
Dieline components
Dielines consists of several elements, each of which serves a specific purpose:
- Cut lines: Mark where the material will be cut.
- Fold lines: Show where the material should be folded.
- Scoring lines: where the material should be scored for easy folding.
- Bleed Area: Ensures the design extends beyond the cut lines to avoid white edges.
- Safe Zone: The area where all critical structural elements should be located to avoid shearing off.

Cutting lines
The cut lines marked in black are probably the most important part of your dieline. They tell you where to cut the part to create your final cover.
Fold Lines
Fold or crease lines are usually marked in red and tell you where to fold the cover. The red dotted lines ensure easy construction of your package once complete.
Bleed Lines
Bleeds are marked in green and separate the excess space from the space that will ultimately represent your artwork design. Bleeds help prevent any obscuring of your artwork and ensure your cover design stays as you planned it in the vector file!
All artwork should “bleed” into the next panel or excess space beyond the cut lines to avoid creating a white border around the edge of the design.
Safe zone
The safe zone is marked as a green dotted line and indicates to the printer which areas are guaranteed to be visible on your custom-printed boxes. Safe Zones help printers align, ensure the correct placement of printed artwork on the finished project, and account for any stock movement during printing.
Adhesive bookmarks
Your adhesive labels will appear as green crosses to indicate where the adhesive needs to be placed in your package design. Note that some packaging structures, such as auto-locking bottom boxes, do not require glue because they are designed to work without glue or tape.
How to create a Dieline
The formation of dieline involves several steps:

- Determine dimensions: Start by determining the dimensions of the final product.
- Use Design Software: Software like Adobe Illustrator is ideal for creating artwork. Adjust the artboard to match the dimensions of your product.
- Outline: Create cut lines, folds, and grooves using the pen tool or the shape tool.
- Add Drop and Safe Zone: Include a drop area (usually 1/8 inch) and a safe zone in your design.
- Line Marking: Clearly mark each line type for easy identification.
Common mistakes to avoid
When creating dielines, it’s important to avoid these common mistakes:

- Wrong Measurements: Always double-check your measurements to make sure they match the final product.
- Ignoring the bleed: Not including the bleed area can result in unwanted white edges.
- Wrong Line Marking: Make sure all lines are marked to avoid confusion during packaging production.
- Crowded Design: Keep the design in a safe zone to avoid cutting off critical elements.
Best Practices for Using Dielines for Prepress and Printing
To get the most out of your days, follow these best practices:
- Collaboration with printers: Work closely with your print partner to ensure your dieline meets their specifications.
- Proof and Test: Always test your dieline and run a test print to detect any problems early.
- Use high-quality images: Make sure all images and graphics are high resolution to avoid pixilation.
- Stay Organized: Keep your dieline files organized and clearly labeled for easy access and revision.
Dielines Creation Tools and Software
Several tools and software can help you create dielines:
- Adobe Illustrator: A versatile tool for creating detailed works.
- Esko ArtiosCAD: Specialized packaging design software.
- CorelDRAW: Another powerful tool for vector design and dieline creation.
- Packly: tool for creating packaging parts.
To place your artwork design on the dieline, you will need Adobe Illustrator to open the file, which as mentioned earlier should be a vector file. Dilinina will also include several different colored lines corresponding to the instructions for the die-cutting machine.
Understanding what these lines mean is essential when placing and placing artwork designs. Please note that each company will have its own standard for the colors listed, but those listed refer to the part standard. With that in mind, let’s take a look at what the individual colors and lines mean.
Preparation for Packaging Production
Once you’ve finalized your dieline design and chosen your printing method, it’s pretty easy to feel 100% confident in your project and send it off to mass packaging production. However, it is essential that your packaging undergoes quality control to ensure that it can withstand all the conditions it may face before mass production.

Work with your manufacturer like CrownPackages to prototype your final design before mass packaging production. This way, your designer or packaging manufacturer can adjust your box dieline depending on any structural issues they may have encountered during the quality control process.
Ordering a sample of your finished design (CrownPackages provides) allows you to physically work with your packaging and reposition and correct any design errors in artwork or text that may appear on your final packaging. But once you approve the prototype samples and make the necessary changes, that’s it! Your packaging part is ready for mass printing and production.
Prepress Workflow and Proper Artwork Design
We’ve already mentioned the prepress process, but what exactly is prepress? Prepress includes all printing processes and procedures between the design of the print layout and the final print. Follow the prepress workflow below to ensure the best accuracy and quality of your dieline designs.

- Dieline: DO NOT flatten/measure/resize dieline templates.
- Color: Artwork files must be formatted for the CMYK color space. CMYK will provide the most accurate color results when transferring your designs from computer to printer. The PMS color code must also be provided with the swatch.
- Artwork: When designing artwork, make sure any artwork “bleeds” into the bleed areas to prevent white spots, but keep the main artwork and information within the borders to avoid clipping. Also, make sure all thin lines in your artwork are at least 0.25 pt.
- Images: Insert any images you use and set the resolution to 300 DPI to prevent blurring.
- Fonts: Place fonts last after all drawings, images, and colors are complete. Make sure the text size is at least 6 pt. and use 100% K for black text, QR codes, or UPC barcodes. Finally, convert all fonts to outlines. The outline ensures that your chosen font is included and avoids problems with missing fonts. To do this, select your text and find “Make Outlines” in the types menu.
Conclusion
Dielines for prepress and printing are an essential aspect of packaging, ensuring that your designs are accurately translated into the final product. By understanding the components, creating accurate parts, and following best practices, you can achieve high-quality, consistent, professional prints every time.